FAQ:
1、No Power After Connecting Power Cable
Check if you are using the cables provided with the CANBUS box. If so, it’s likely that the CANBUS box isn’t correctly connected to the main unit. Ensure the RX/TX wires are properly inserted into their respective positions on the main unit to avoid damaging it. If the issue persists, please prepare installation wiring photos and contact us.
2、Device Powers On but Steering Wheel Controls, Air Conditioning, or Audio Do Not Work
Many car models typically require a CANBUS box to decode original car functions like steering wheel controls and rearview functions. After connecting the CANBUS box, you need to power on the device, connect to WiFi, enter settings, and input the factory password 123456 for car model selection. The principle for model selection is to choose options that match exactly; if not available, choose the closest match. If issues persist, prepare installation wiring photos and contact us.
3、Unable to connect to the internet or weak signal, unable to connect to phone, unable to play Bluetooth music or experiencing lag.
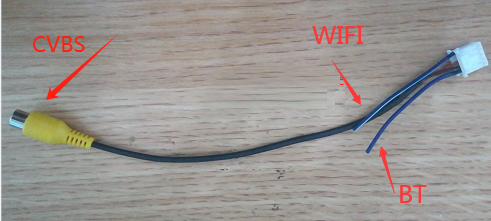
Check if the CVBS cable is correctly plugged into the main unit. This cable serves as both the rearview camera input and the signal cable for Bluetooth and Wi-Fi. Even if using the original car’s rearview camera, our CVBS cable must be used. If issues persist, prepare installation wiring photos and contact us.
4、CarPlay & Android Auto Connect
Support both wired and wireless connections. In the program menu, look for an icon named Tlink5 or similar to connect. Connectivity issues or lag are typically software-related, not due to wiring or hardware. If unable to connect, try using a different phone or switch between wireless and wired connections. Restart the device, delete Bluetooth connections and CarPlay history, then reconnect. If music playback stutters, adjust settings to disable location. For further assistance, contact us. Familiarizing yourself with connection procedures and habits and researching online can be helpful. Contact us if issues persist.
5、Original Rearview Camera Not Working
If the original rearview camera plug doesn’t match the CVBS cable plug, you’ll need to purchase a suitable adapter cable yourself. Some car models may not support the original rearview camera; contact us for verification. For these models, use the camera we provide. If the camera image is distorted when reversing, adjust HD settings in the reverse settings menu. If issues persist, prepare installation wiring photos and contact us.
6、No Sound in Amplifier-Equipped Vehicles
Ensure correct RCA cable connection; these cables carry audio signals. Unused plugs in some vehicles may not be necessary. If you still have no sound after correct cable connection and your original car has an amplifier (like JBL, BOSE, Harman/Kardon), consider connecting the “AMP CONT” cable. Contact us for connection methods. Amplifier-equipped vehicles have various possibilities; prepare installation wiring photos and contact us if issues persist.
7、Music Playback Stuttering
This issue typically occurs when playing music from a connected phone, such as via Bluetooth or CarPlay. Refer to issue 3、4 for troubleshooting tips. adjust settings to disable location.Contact us if issues persist.
8、Incorrect Cables or Mismatched Frame
Power Cable: In some cases, multiple sets of cables (individually packaged) are provided to accommodate different scenarios. Choose based on your original car harness plug. Our power cables may have more connectors than the original; connect only those from the original harness. Conversely, if our wiring has fewer connectors, some original connectors may not be needed. Contact us if you find mismatched or missing cables; we’ll cover the costs.
Frame: If the received frame doesn’t match your original car, contact us for a replacement; we’ll cover the costs.
Please take several important pictures during Installation. Please ensure this is done. Not having these pictures when you encounter an issue means you may need to dismantle the radio again to proceed.
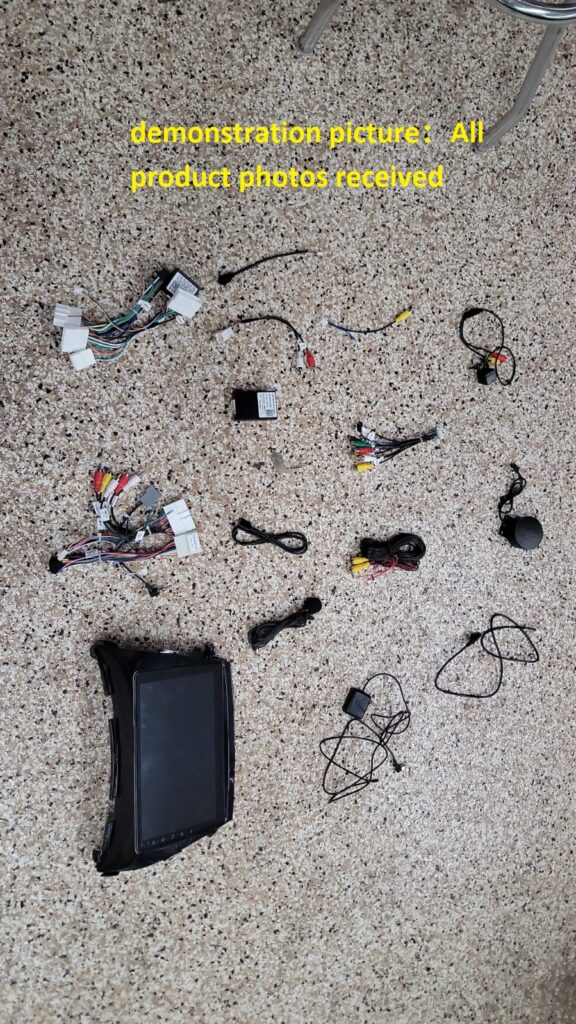
1、Please lay out all the received items and take photos for documentation.
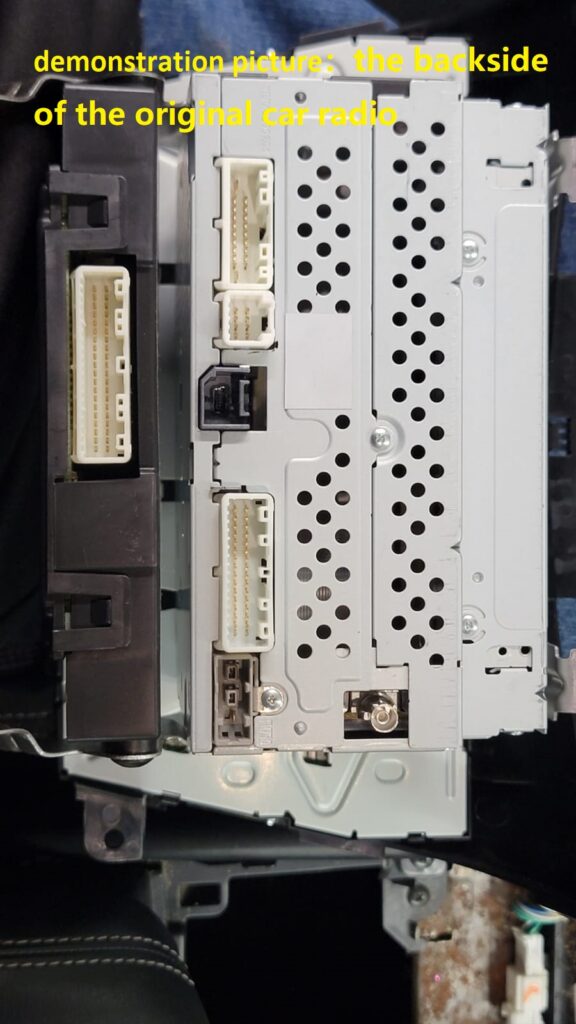
2、Please take photos to document the backside of the original car radio and its wiring plugs.
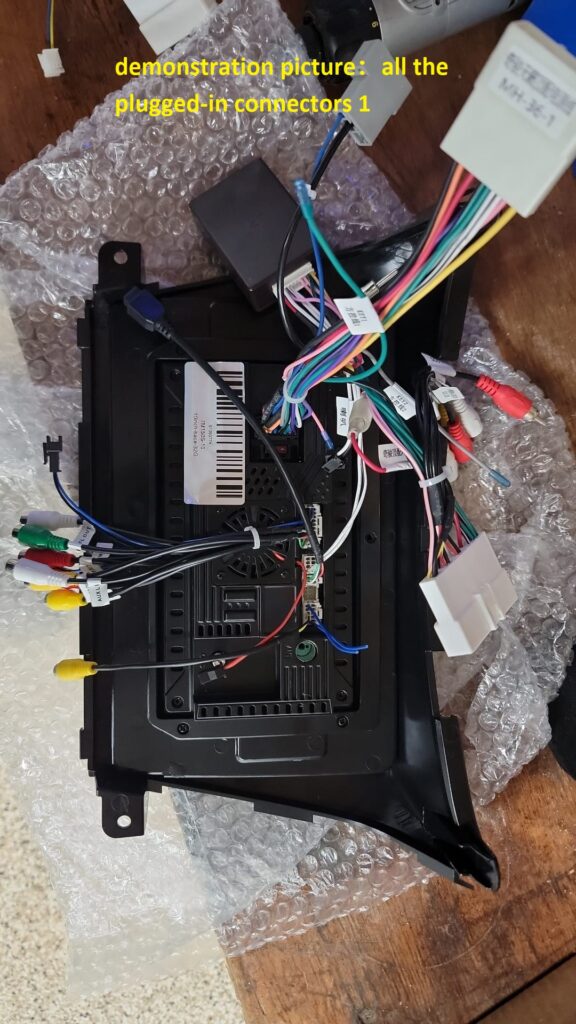
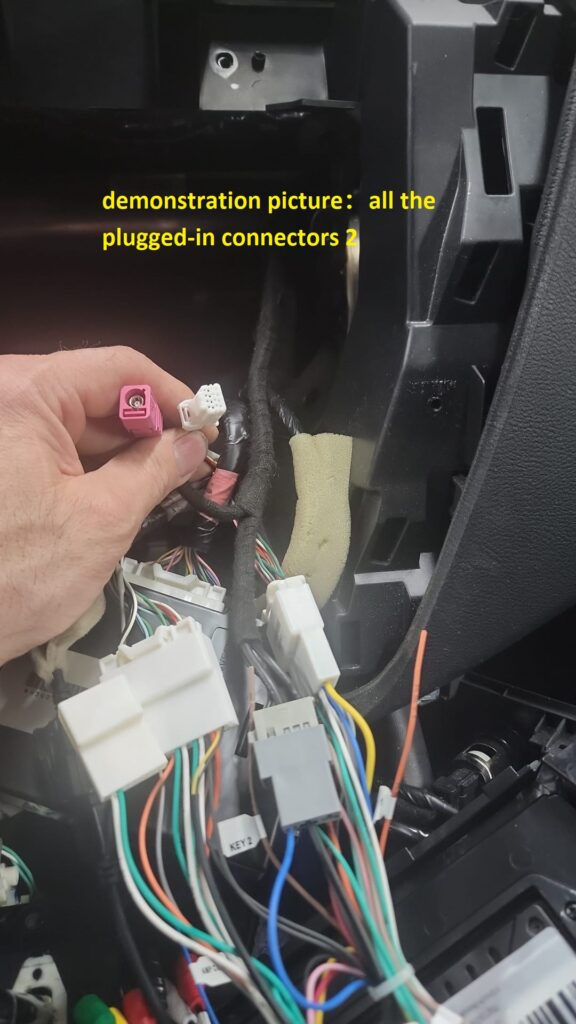
3、After all connections are made, including connections to the head unit and connections to the original car’s wiring, please take photos to document all the plugged-in connectors.
Please make sure to provide detailed descriptions of the specific issues and any important details you consider relevant when contacting us.
Installation instructions
We are a responsible provider of in-car navigation systems, backed by a professional team. We are committed to patiently resolving any issues you encounter. Communication is pleasant, and it builds friendships. If you encounter any problems, please contact us at sales@car-part-shop.com promptly. Work with us to identify and resolve the issues.
Because the installation of different car models from different years and brands varies greatly, with thousands of possible variations, there is no single, dedicated installation manual available from manufacturers in the entire in-car navigation market. However, the principles remain the same. Our engineers have accumulated extensive practical experience and continually develop solutions, ensuring that every customer can successfully install the system with our assistance.
The bold text below requires you to take several important pictures. Please ensure this is done. Not having these pictures when you encounter an issue means you may need to dismantle the radio again to proceed.
Before Installation:
Familiarize yourself with all the items received (head unit + frame + cables).
Important: Please lay out all the received items and take photos for documentation.
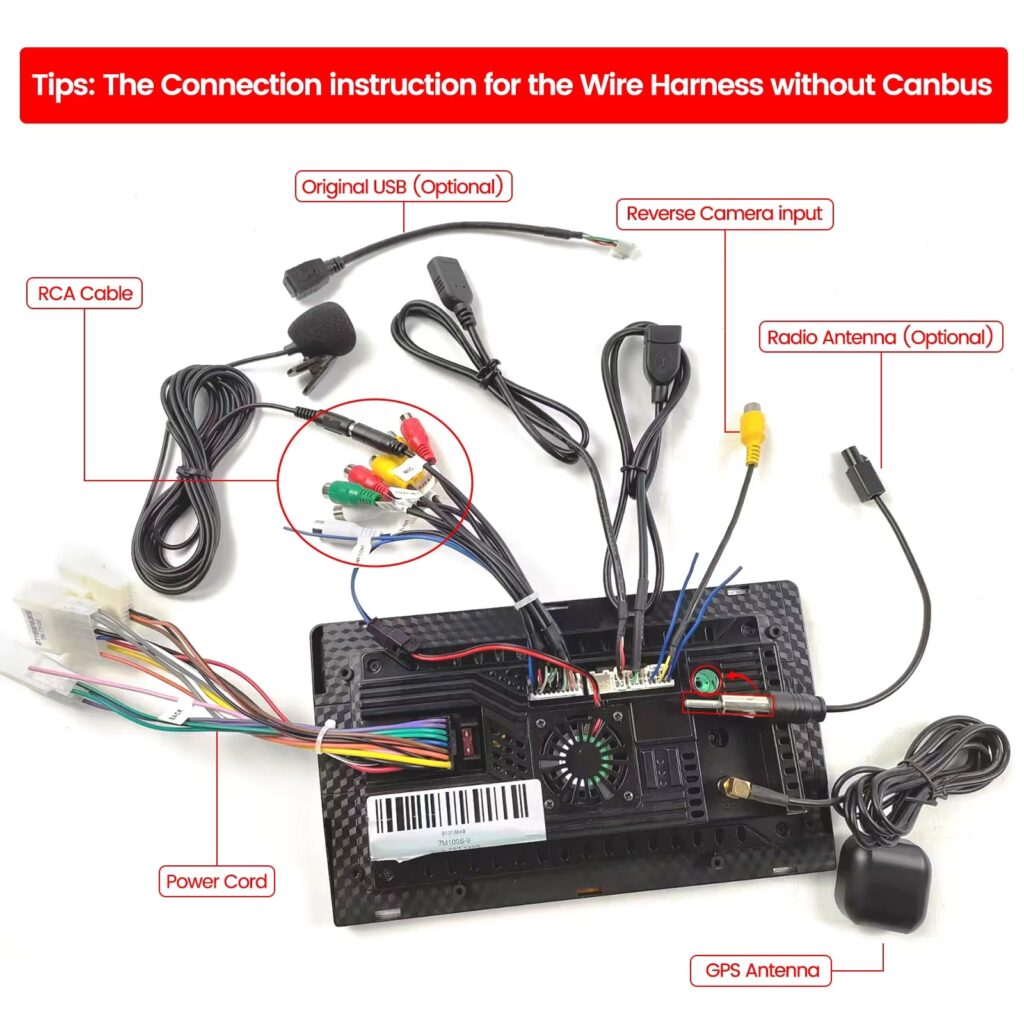
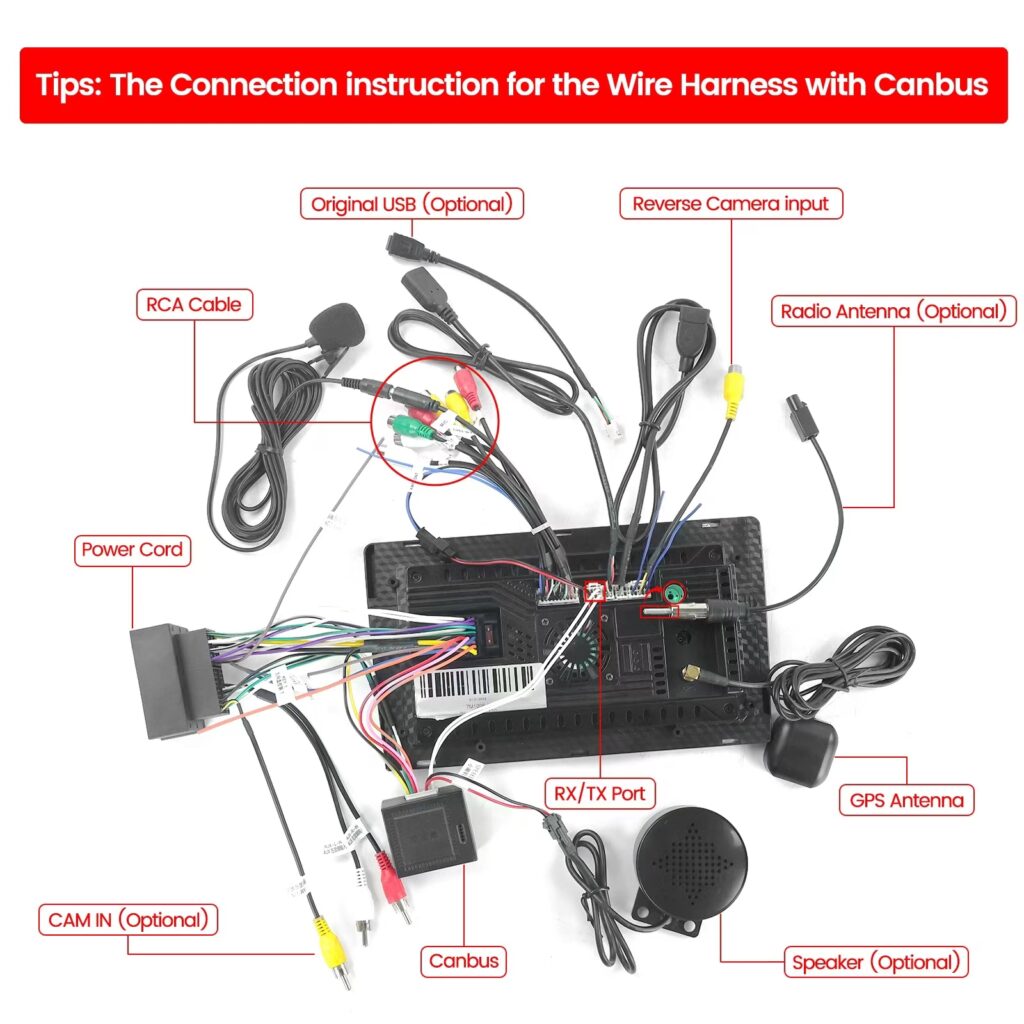
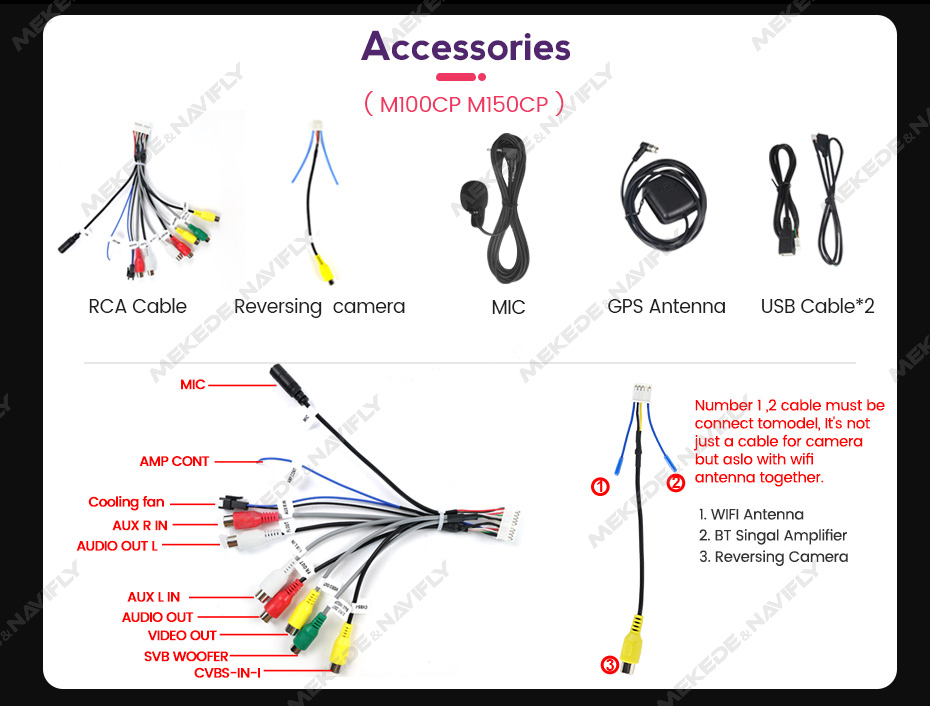
Cables:
1.Power Cable: Plug-and-play cables. In some cases, we may send multiple sets of cables (each set packaged separately) to accommodate various possibilities. You need to choose one set based on the plug of your original car harness. Our power cables may have more connectors than the original car. In such cases, simply connect the connectors from the original car harness; the extra connectors are not needed.On the contrary, when the number of connectors in our wiring is fewer than those in the original car, it means that some of the original car’s connectors do not need to be connected.
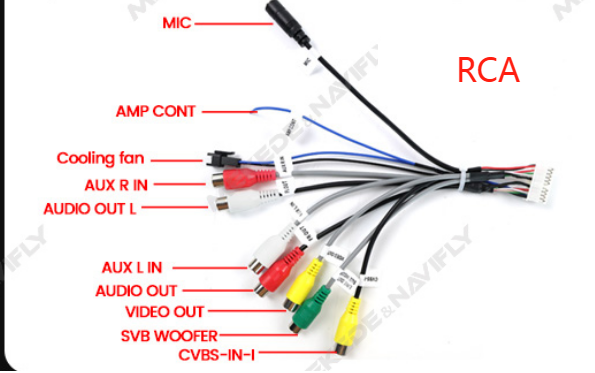
2.RCA Cable :it is audio cable. Unused plugs in some vehicles do not need to be used. Among the RCA cables, there is one marked “AMP CONT,” which is usually not needed. However, if you still have no sound after connecting all the cables correctly and your original car has an amplifier such as JBL, BOSE, Harman/Kardon, etc., you need to consider connecting this cable. Please contact us for the connection method.
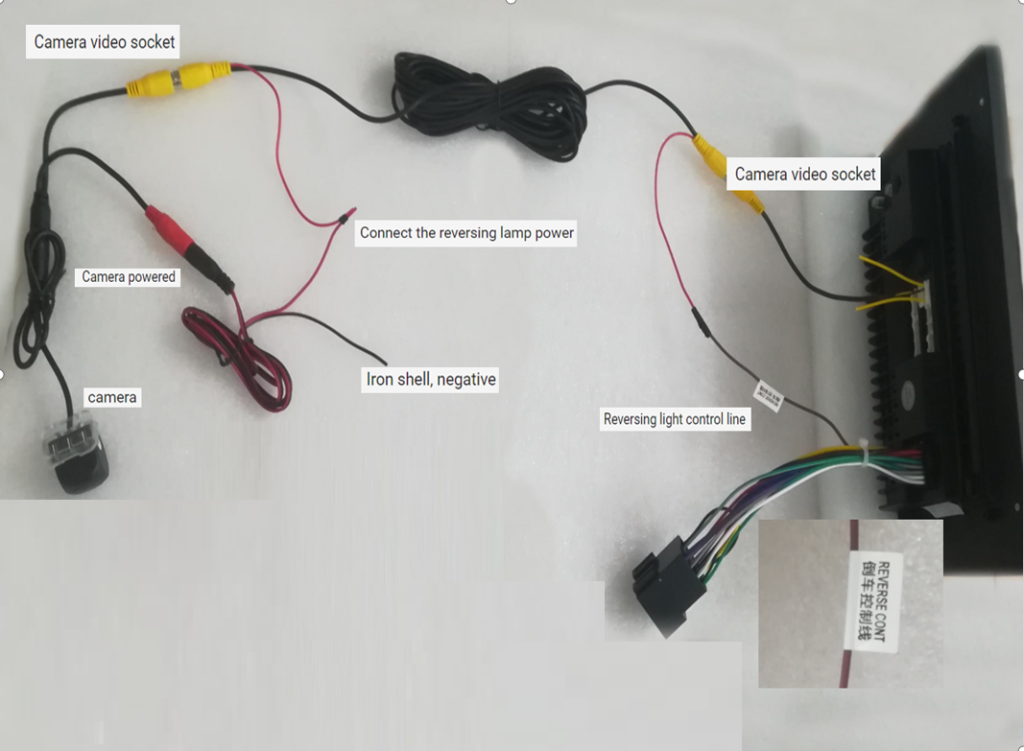
3.CVBS Cable : it is rearview camera cable,This cable must be plugged into the head unit. It is not only the rearview video input but also the signal cable for Bluetooth and Wi-Fi.
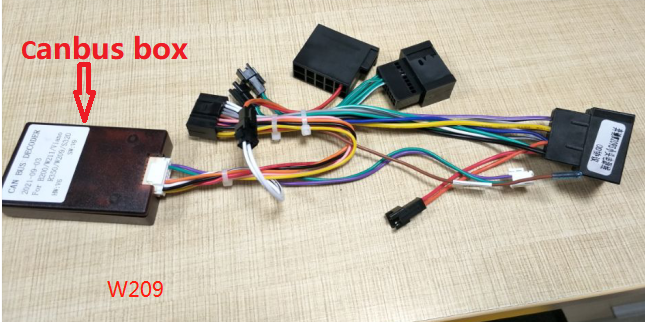
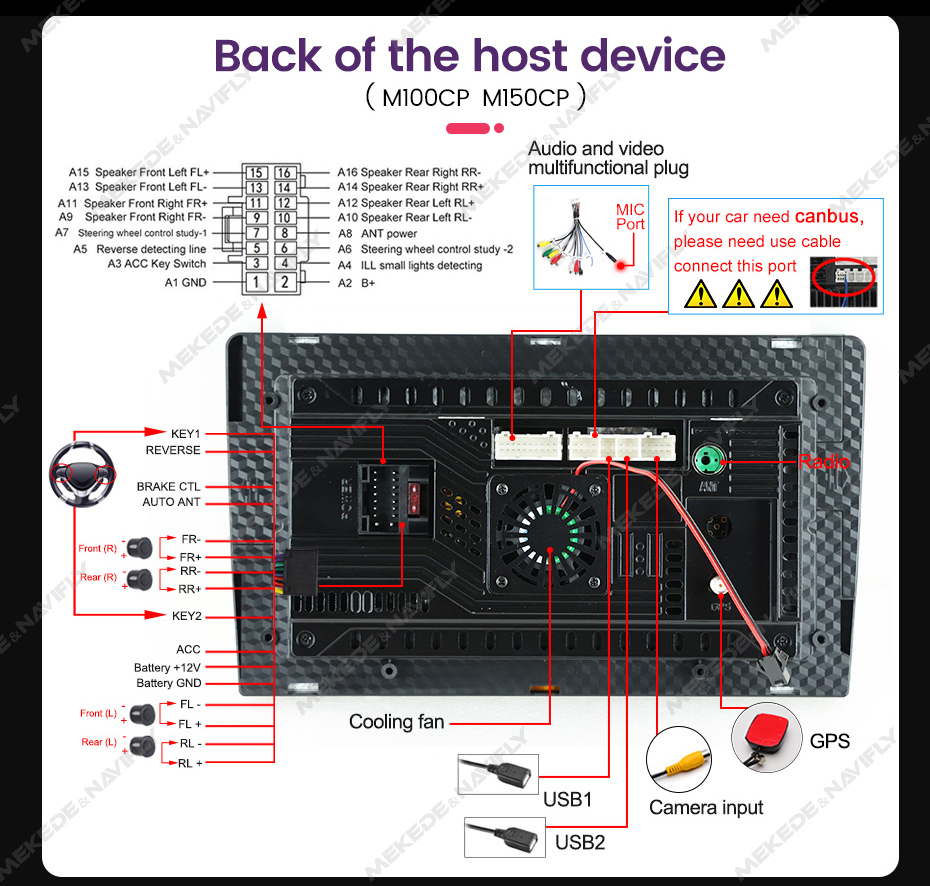
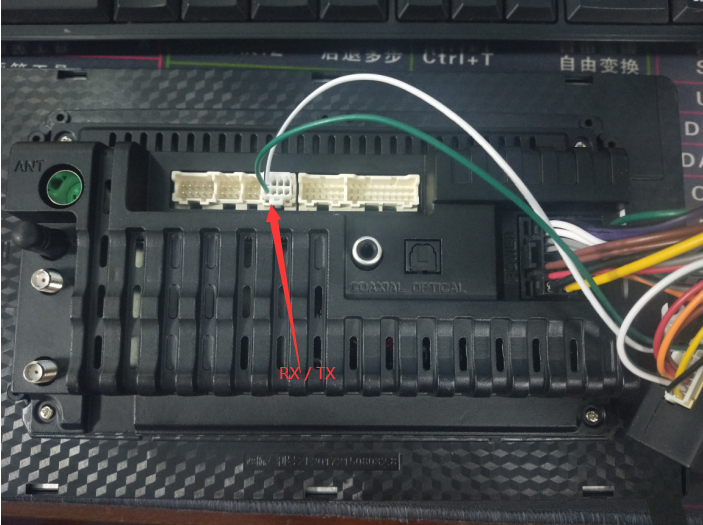
4.Canbus Box and RX/TX Cable: Its role is significant, used to decode the functions of the original car, such as air conditioning control and steering wheel control. It also controls the power startup. Models equipped with a Canbus Box must correctly connect the Canbus Box to the head unit to power on and to control the air conditioning and steering wheel. Key point: Do not plug the RX/TX cables into the wrong positions, as this can easily cause a short circuit. This is easily avoided; simply follow the demonstration diagram to ensure the RX/TX cables are plugged into the correct positions.
5. Camera and cable: Please refer to the connection diagram below.
6. GPS cable
7. ANT cable
8. USB cable
If you find any cables that do not match the original car or are missing, please contact us for reissue. We will cover the costs.
Frame:
If you receive a frame that does not match the original car, please contact us for a replacement. We will cover the costs.
During Installation:
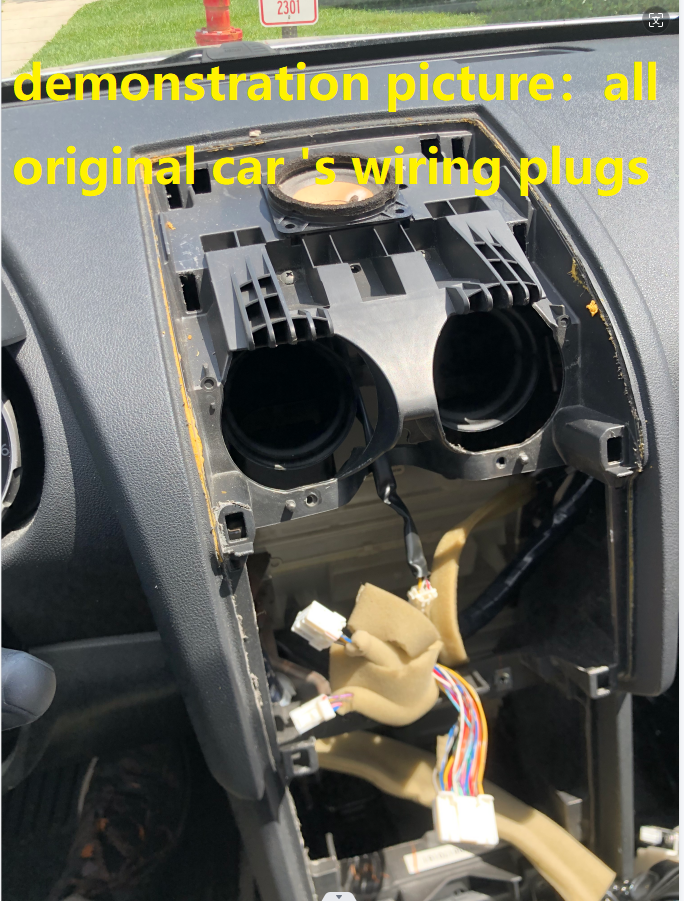
After removing the original car radio, you will see the backside of your original car radio and the plugs of the original car’s wiring.
Important: Please take photos to document the backside of the original car radio and its wiring plugs.
Wiring and Testing
Testing:
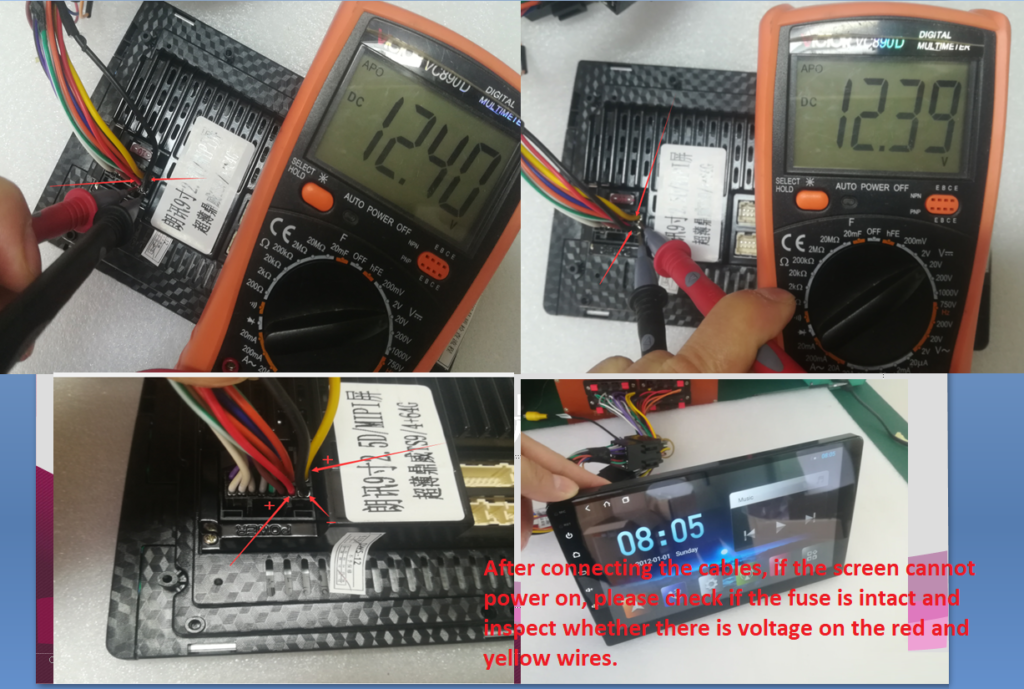
Check if the screen boots up properly, and if the original car functions correctly, such as speaker sound, steering wheel control, air conditioning control, and rearview camera.
Wiring:
Important: After all connections are made, including connections to the head unit and connections to the original car’s wiring, please take photos to document all the plugged-in connectors.
Do not plug or unplug wires while the power is on, and make sure not to plug the RX/TX wires into the wrong positions. For models equipped with a Canbus Box, the Canbus Box must be connected to the head unit.
Vehicle Settings
1. After correctly connecting the wiring, you need to perform vehicle-specific settings, such as steering wheel control, air conditioning control, and rearview camera settings.
The factory password is 123456 or 8888 or 3368. After entering the settings, select the correct protocol box brand, vehicle model, and year. If there are no exact matching options, don’t worry; selecting similar options is also acceptable as the functionality is consistent. If the functions are incomplete, try several options.
2. CarPlay and Android Auto
Support both wired and wireless connections. There is an icon in the program menu called Zlink or similar; click on it to connect.
If there are issues with connectivity or lagging, it is not a wiring or hardware problem but a software issue. If unable to connect, try using a different phone for testing or switch between wireless and wired connections. First, restart the device, delete the Bluetooth connections and CarPlay’s historical connections, then pair and reconnect. If there is music playback stuttering, find the setting shown in the image below and disable location.
If you have any questions, please contact us for assistance.
There are some demonstration images below: